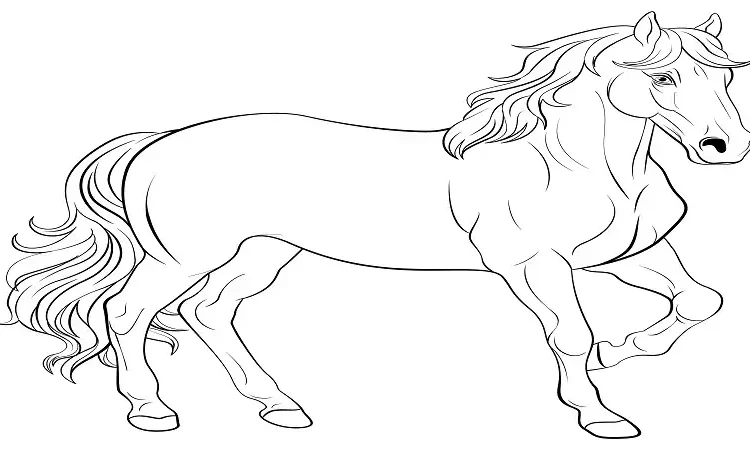
Drawing horses is a captivating endeavor that blends artistry with a profound understanding of anatomy, movement, and form. Whether you’re a beginner or an experienced artist, mastering the art of outline:cnv3uizs7vu= horse drawing can be both challenging and rewarding. This article explores the essentials of horse drawing, including techniques, tips, and common mistakes, offering a comprehensive guide to help you refine your skills.
Understanding Horse Anatomy
Before diving into drawing techniques, it’s crucial to understand the anatomy of the horse. This knowledge will enable you to create more realistic and accurate representations.
1. The Basic Structure
A horse’s body is divided into several key components: the head, neck, torso, legs, and hooves. Each part has unique characteristics and proportions. Start by breaking down the horse into simple shapes:
- Head: The head is roughly oval-shaped, with a pronounced muzzle and a somewhat flat forehead. The eyes are large and positioned on the sides.
- Neck: The neck is long and muscular, connecting the head to the torso. It should gradually taper as it moves toward the shoulders.
- Torso: The torso is a large, oval shape. It includes the chest, ribs, and back, all of which should flow smoothly into the neck and legs.
- Legs: Horses have four legs, each with distinct sections: the upper leg (thigh), lower leg (shank), and the hoof. The legs are slender but powerful, and their positioning can convey movement and balance.
2. Muscle Groups
Understanding the major muscle groups will enhance the realism of your drawing. Key muscles include:
- Shoulders and Chest: These are robust and muscular, providing power for movement.
- Back and Ribs: The back should be smooth and slightly curved, while the ribs provide a rounded form.
- Hindquarters: The hindquarters are particularly muscular, contributing to the horse’s propulsion and speed.
Drawing Techniques
With a grasp of anatomy, you can focus on specific drawing techniques to capture the essence of the horse.
1. Sketching the Basic Shapes
Start with light pencil strokes to outline the basic shapes. Use simple geometric forms like circles and ovals to represent the head, torso, and joints. This step helps in establishing the proportions and overall pose of the horse.
- Head: Draw an oval for the head and add guidelines to position the eyes, ears, and muzzle.
- Torso: Sketch an elongated oval or rectangle for the torso, ensuring it connects smoothly with the neck and legs.
- Legs: Use lines and ovals to outline the legs and joints. Ensure that the legs are positioned correctly according to the horse’s stance.
2. Adding Details
Once the basic shapes are in place, refine the drawing by adding details:
- Facial Features: Focus on the eyes, ears, and muzzle. Horses have expressive eyes and distinct ear shapes, which contribute to their character.
- Muscle Definition: Lightly sketch the muscle groups, paying attention to how they overlap and interact. Use curved lines to indicate the flow of muscles.
- Legs and Hooves: Define the legs and hooves more clearly, adding details like joints, tendons, and the unique shape of the hooves.
3. Refining and Shading
To give your drawing depth and dimension, refine the lines and add shading:
- Refine Lines: Erase unnecessary guidelines and smooth out the lines. Focus on achieving a clean and accurate outline.
- Shading: Use different shading techniques, such as hatching and cross-hatching, to create the illusion of light and shadow. Pay attention to the light source and how it affects the horse’s form.
Common Challenges and Solutions
Drawing horses can present several challenges. outline:cnv3uizs7vu= horse drawing are some common issues and how to address them:
1. Proportions
Achieving accurate proportions can be difficult. Use reference images and compare different parts of the horse to ensure proportional accuracy. Practice drawing different poses and angles to build confidence.
2. Movement
Capturing the dynamic movement of an outline:cnv3uizs7vu= horse drawing requires observation and practice. Study photographs of live horses to understand how their bodies move. Practice drawing horses in various gaits, such as trotting and galloping.
3. Textures
Rendering the outline:cnv3uizs7vu= horse drawing’s coat texture can be tricky. Use varied pencil strokes to mimic the texture of fur. Experiment with different techniques to achieve a realistic appearance.
Tools and Materials
Having the right tools and materials can significantly impact the quality of your drawing. Here’s a list of essential items:
- Pencils: Use a range of pencils (e.g., HB, 2B, 4B) for different shading and detailing.
- Paper: Choose high-quality drawing paper that can handle erasing and shading.
- Erasers: Have both regular and kneaded erasers to correct mistakes and refine details.
- Reference Images: Collect images of horses in various poses and angles for reference.
Practice and Resources
Improving your outline:cnv3uizs7vu= horse drawing skills requires consistent practice and study. Here are some resources to help you:
- Books: Look for books on horse anatomy and drawing techniques.
- Online Tutorials: Explore video tutorials and online courses to learn from experienced artists.
- Practice: Regularly practice drawing horses from different perspectives and in various poses.
Conclusion
Mastering outline:cnv3uizs7vu= horse drawing is a journey that involves understanding anatomy, perfecting techniques, and overcoming challenges. By focusing on these key aspects and continuously practicing, you can develop the skills needed to create stunning and realistic horse drawings. Whether you’re drawing for personal enjoyment or professional purposes, the art of outline:cnv3uizs7vu= horse drawing offers endless opportunities for creativity and expression. See More